

When setting up gravel under your deck, it’s important to do it right so it stays in place and prevents weeds or pests from settling in. Here’s a simple way to do it:
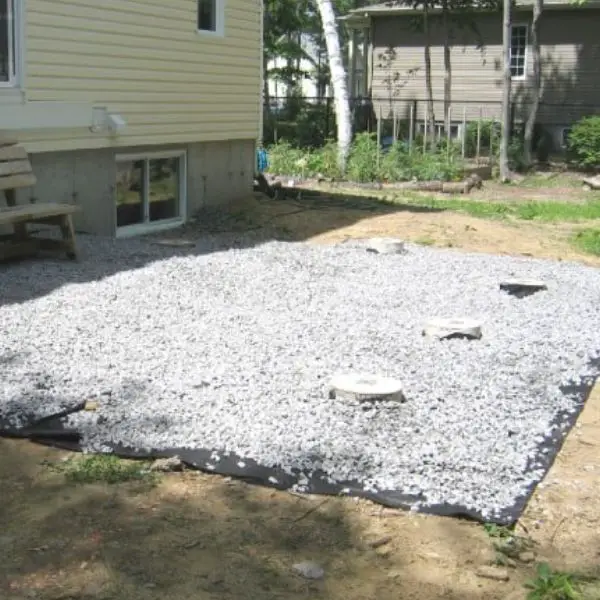
Start by putting down landscaping fabric. This helps keep the gravel in place and stops weeds from growing through. Next, start spreading gravel over the fabric. Use 4-inch rocks to figure out how thick you want the gravel layer to be.
To keep the fabric down, place a plank under the wheelbarrow’s tire guard. This helps to secure everything and avoids creating spots where water can pool. After you’ve spread the gravel, use a shovel and a spade to level it out.
Remember, simply spreading the gravel isn’t enough. You should also extend the stone beyond the deck’s edges. This keeps the area looking neat and weed-free for a longer time. It’s a DIY project that needs careful attention and following steps closely for the best results.
Simple Steps for Adding Gravel Under Your Deck
Putting gravel under your deck is a great way to enhance its look and functionality. Here’s an easy guide to do it:
- Prepare the Area: First, focus on the area where you’ll be working. Make sure it’s clear and ready for gravel.
- Add a Base Layer: Put down about an inch of sand, gravel, or pea rock. This creates a level base for the next steps. Fill any gaps with soil similar to your yard’s soil, mixing in some organic matter. Tamp it down well.
- Be Careful with Boulders: If there are large rocks or boulders, be careful. They should not be in a position where the deck’s weight could push down on them.
- Level the Base: Before laying pavers or stones, ensure the base is flat and level. You might need to use a stake to check this.
- Determine the Length: Next, figure out how long your pavers or stones need to be. This depends on various factors like distance from the deck and the size of the area.
- Cut the Piers: If you’re using piers or supports, cut them to the right length with a saw.
Install the Piers: Once cut, place your piers or supports in position, checking for level and alignment. - Mark and Fill: Mark the position of each pier clearly, then fill the area around them with loose soil until it’s about 4 inches deep.
- Secure the Piers: To keep the piers stable, fill around them with more soil or gravel. Do this carefully and bit by bit.
- Add More Gravel: If needed, add more gravel to cover the soil, doing this one layer at a time.
- Create a Slope for Drainage: Around each pier, slope the soil or gravel away to prevent water from pooling.
Tips for Safely Adding Gravel Under Your Deck
Safety First
Before you start, put on gloves and safety glasses to protect yourself from sharp stones and debris.
Gravel can be heavy, so it’s better to have two people working on this project.
Make sure there are no low spots where water can collect. You want air to flow underneath. If needed, add more stones or use sand for the top layer to level things out.
Why Gravel is a Great Choice
- Gravel helps water flow away from the deck, preventing water pools and wood damage.
- It slows down water flow and reduces soil erosion under the deck.
- A layer of gravel, especially with landscape fabric underneath, blocks weeds and makes it hard for animals to settle.
- Gravel keeps water away from deck posts and foundations, reducing rot and damage.
- It covers up muddy or weedy areas, giving a neat and tidy appearance.
- Extra Storage Space: For raised decks, gravel underneath can create a dry storage area for things like toys or garden tools.
How Much Gravel Do You Need?
- Aim for a gravel depth of about 2 inches (50mm). This is enough to cover the ground fabric and prevent weeds. It’s also a good depth for working and raking the gravel.
- To figure out how much gravel you need, remember that a 2-inch deep layer of gravel will cover 100 square feet.
- So, when putting gravel under your deck, remember these safety tips and benefits. It’s a practical and visually appealing addition to your deck area.
Basic Guide to Adding Gravel Under Your Deck
Preparing the Ground
Remove any ground cover where you’ll put the gravel.
- Create a Crushed Aggregate Base
Use a tiller or jackhammer to make a base layer. How thick this layer should be depends on how deep the frost goes in your area:
- Less than 15 inches deep frost: 1 inch of base layer.
- 18 to 18+ inches deep frost: 2 inches of base layer.
- More than 18 inches deep frost: 3 inches of base layer.
- Lay Geotextile Cloth
On top of your base layer, put down a 4-inch geotextile cloth for extra support and compact it with a roller.
How Much Gravel Do You Need?
- Best Gravel Type: Use 3/4″ size gravel, either pure or washed.
- Depth of Gravel: Aim for a 3 to 4-inch layer of gravel. A thinner layer might not prevent weeds and can be easily moved by animals or people.
- Cover the Weed Barrier: Spread the gravel over any weed barrier cloth or plastic. It should be thick enough to stop weeds and stay in place.
- Calculating the Amount: To figure out how much gravel you need, multiply the length of your deck by its width, then by the thickness you want. This gives you the cubic area of gravel needed. Divide this number by 27 to get the cubic yardage you need to order.
- This basic guide should help you get the right amount of gravel and prepare your deck area effectively.
Easy Guide to Choosing Gravel for Under Your Deck
When picking gravel for under your deck, you’ve got several good options:
Screen Crushed Rock: This is rock that’s been broken into small pieces. It’s not very colorful, coming in shades like off-white, gray, brownish-red, and tan. It’s not the prettiest, but it’s cheap and works well under a simple deck.
River Rock
These are smooth, rounded rocks. They come in sizes from tiny (1/2 inch) to pretty big (8 inches). The smooth edges make them easy to walk on and they don’t trap much debris. They’re a bit more decorative, especially the smaller 1/2 to 1-1/8 inch sizes.
Egg Rock
These are egg-shaped stones, 1 to 2 inches big. Like river rocks, they’re smooth and don’t catch much leaves or dirt. But they’re a bit harder to walk on because of their shape.
Pea Gravel
This is made up of small, pea-sized stones, ranging from 1/8 to 3/8 inch. They come in natural colors like brown, black, white, gray, and even clear. It looks nice, especially under decks without skirting, and feels good to handle.
Rundle Rock
This is similar to crushed rock but is charcoal colored and angular shaped. When it gets wet, its color looks richer. It’s pretty expensive, about 2.5 times more than crushed granite. But if the area under your deck is visible and adds to your yard’s look, it’s a great choice, especially for raised decks in noticeable areas.
Choosing Gravel for Under Your Deck and Other Tips

When you’re thinking about putting gravel under your deck, here are some things to consider:
Bagged vs. Bulk Gravel
Gravel that comes in bags is easier to handle, but it might be mixed with unwanted debris, making it harder to maintain.
On the other hand, buying gravel in bulk is often cheaper and can be spread out easily, just like mulch.
Ground Level Decks
If you’re working with a ground-level deck, especially if your soil has a lot of clay, using crushed rock or pea gravel is a good idea.
This helps protect the wood of the deck from moisture damage. If the soil is sandy and not clay-rich, you can use coarser materials like dirt or sand.
Deck Blocks and Gravel
It’s not necessary to put gravel under deck blocks. The belief that gravel stops water from seeping into the ground isn’t true.
Instead, it’s better to put sand or crushed stones on top of the deck blocks. Then cover them with soil, mulch, or sod. This way, water can drain through the gravel and blocks into the ground.
Final Thoughts
Gravel is a great and affordable way to deal with issues under your deck. It’s good at stopping weeds and doesn’t soak up moisture, making it a smart choice for the space under your deck.
In this article, we’ve given you a step-by-step guide, some safety tips, and expert advice on how to do it.
Just remember to follow these steps carefully to avoid mistakes and keep the area under your deck looking good and useful.
Regular maintenance and cleaning are also important. Now, you should have a clear understanding of how gravel can be a big help for your deck.
Hina Kanwal is the dynamic force behind Deckfaqs.com, blending her expertise in deck design with actionable insights. Known for her engaging content and practical advice, she empowers homeowners to elevate their outdoor spaces. Her passion and knowledge make her a trusted voice in the world of deck-building.


